DHT11 Reading
In this example we will read the DHT11 temperature and humidity sensor and print the values to the serial terminal.
Required Materials
Identify the following materials needed for this project:
- 1 Franzininho WiFi
- 1 DHT11 sensor
- 1 10k resistor
- 1 Breadboard
- Jumper wires
Circuit
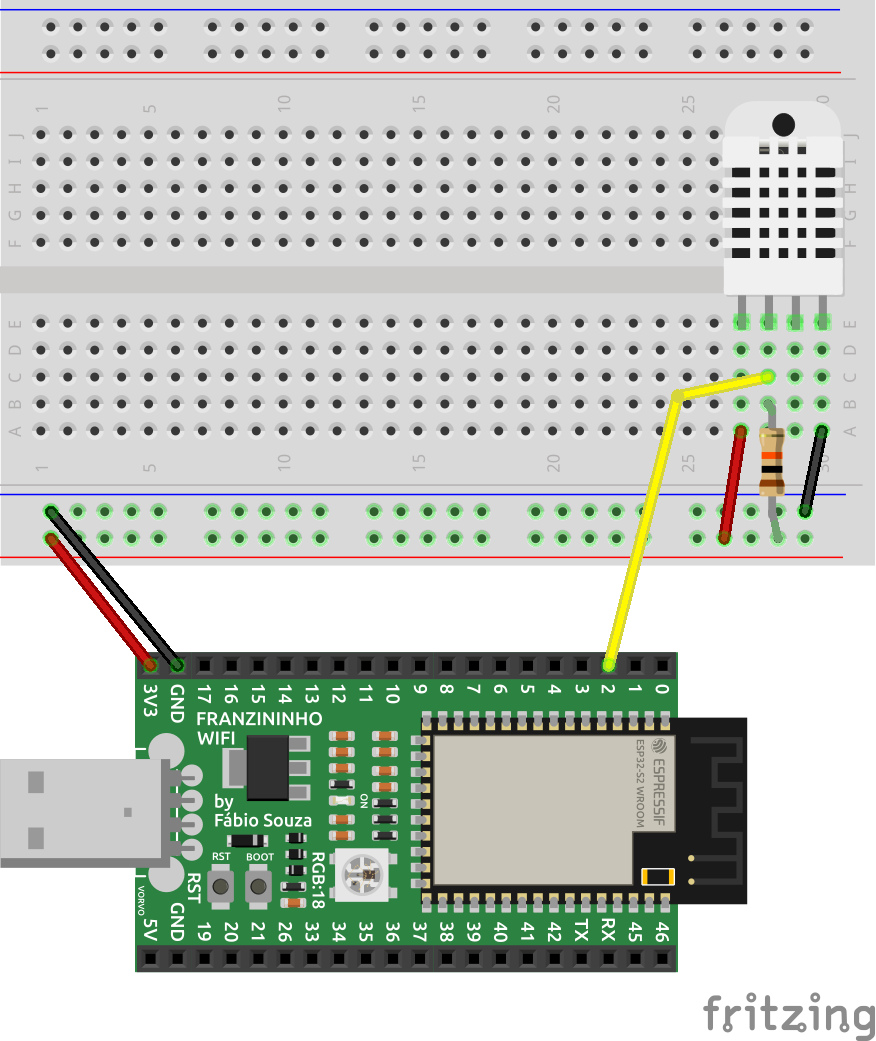
Assemble the circuit as shown in the figure below:
Code
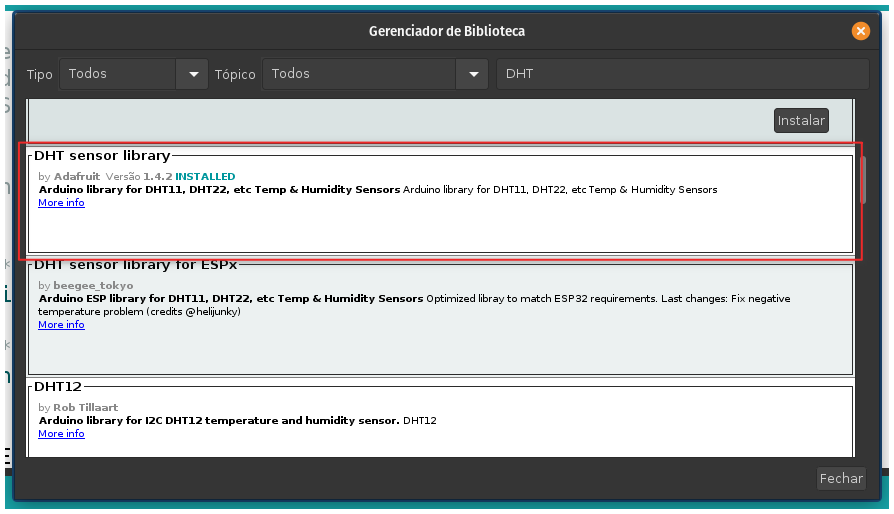
To use the DHT sensor with the Franzininho WiFi on Arduino, we need to install a library. We will use the library maintained by Adafruit.
Install the library using the Arduino Library Manager. Go to Tools -> Manage Libraries. Search for DHT and install the "DHT sensor library" by Adafruit:
Now let's read the sensor and print the temperature and humidity values to the serial terminal.
/*************************************************************************************
 * Example for DHT11 sensor reading
 *
 *
 * Required libraries:
 * DHT by Adafruit - Install via the Library Manager
 *
 *  by: Fábio Souza
 *************************************************************************************/

#include "DHT.h"

#define DHTPIN 2
#define DHTTYPE DHT11

DHT dht(DHTPIN, DHTTYPE);


/*********************************************************************************
 *  Setup function
 *  Initial application configuration
 *********************************************************************************/
void setup()
{
Serial.begin(19200);
Serial.println("DHT11 sensor reading test");
dht.begin();
}

/*********************************************************************************
 *  Loop function
 *********************************************************************************/
void loop()
{

  float humidity = dht.readHumidity();
  float temperature = dht.readTemperature();

  delay(500);


  // If temperature and humidity variables are not valid values, a read failure will be reported.
  if (isnan(temperature) || isnan(humidity))
  {
  Serial.println("Failed to read from DHT11...");
  }
  else // otherwise, display the read values
  {
    // Print data to the serial monitor
    Serial.print("Humidity: ");
    Serial.print(humidity);
    Serial.print(" %\t"); // tab
    Serial.print("Temperature: ");
    Serial.print(temperature);
    Serial.println(" °C");
  }
}
Code Analysis
In the first part of the code we add the libraries to be used in the application and the DHT11 instance:
#define DHTPIN 2
#define DHTTYPE DHT11

DHT dht(DHTPIN, DHTTYPE);
In the setup() function we initialize the DHT11 and serial communication:
void setup()
{
Serial.begin(19200);
Serial.println("DHT11 sensor reading test");
dht.begin();
}
In the infinite loop() we read the temperature and humidity every 500 ms and print to the serial. If the DHT11 read fails, an error message is displayed:
void loop()
{

  float humidity = dht.readHumidity();
  float temperature = dht.readTemperature();

  delay(500);


  // If temperature and humidity variables are not valid values, a read failure will be reported.
  if (isnan(temperature) || isnan(humidity))
  {
  Serial.println("Failed to read from DHT11...");
  }
  else // otherwise, display the read values
  {
    // Print data to the serial monitor
    Serial.print("Humidity: ");
    Serial.print(humidity);
    Serial.print(" %\t"); // tab
    Serial.print("Temperature: ");
    Serial.print(temperature);
    Serial.println(" °C");
  }
}
Result
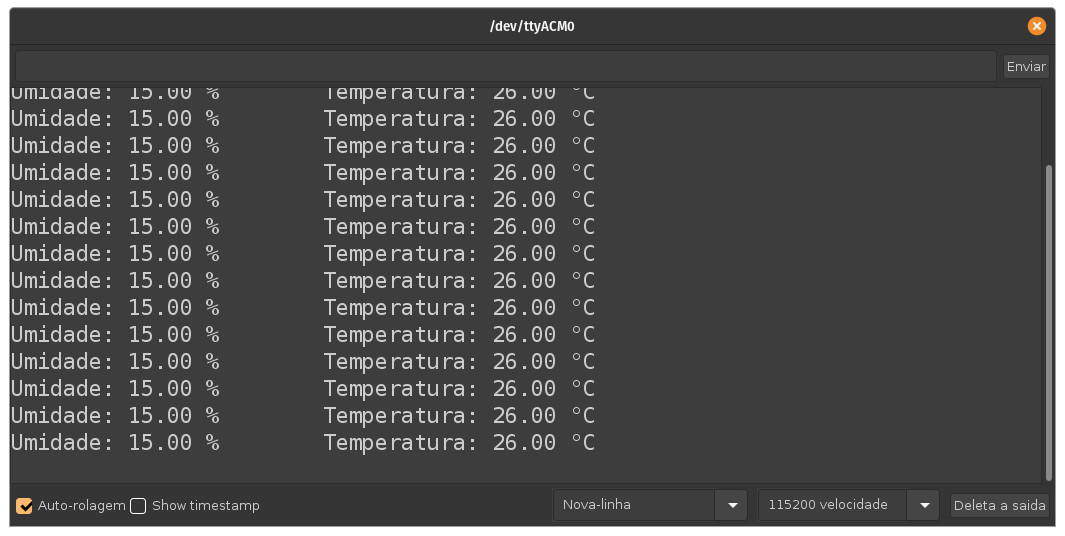
The figure below shows the values read in the serial monitor:
Conclusion
The DHT11 sensor (and similar ones) allows us to read temperature and humidity in a simple and efficient way. Using a single communication wire we can read both values. Since the communication protocol is somewhat complex, using a library simplifies communication with the device. The library maintained by Adafruit is very efficient and stable.
If you have any questions, consult the Franzininho community on Discord
| Author | Fábio Souza |
|---|---|
| Date: | 23/10/2021 |