Neopixel RGB LED Onboard
In this example we will learn how to use the onboard NeoPixel RGB LED on the Franzininho WiFi.
Library Installation
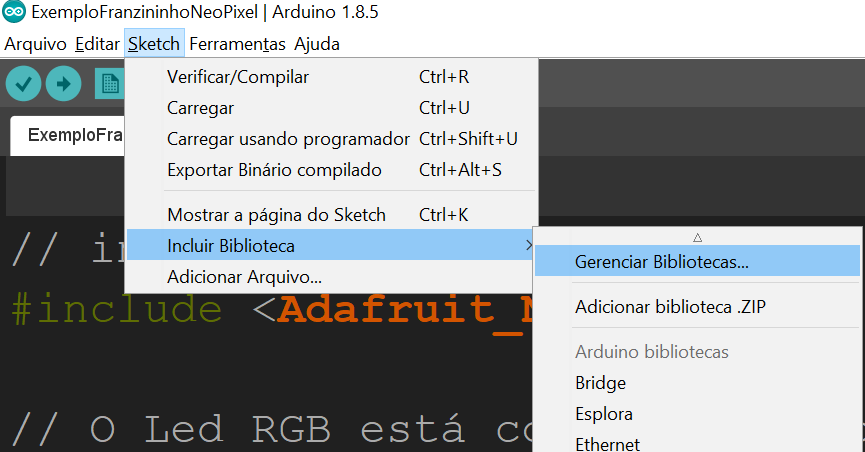
In the Arduino IDE, click Sketch -> Include Library -> Manage Libraries
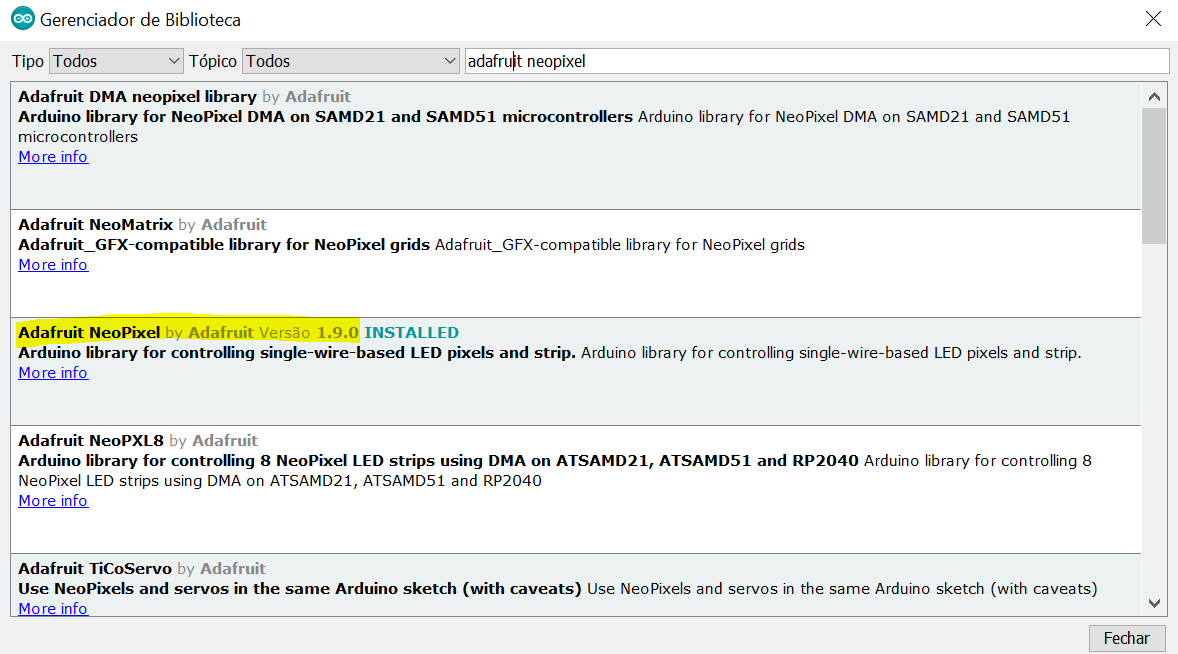
Select: "Adafruit NeoPixel by Adafruit Version X.X.X" and click Install
After selecting the Franzininho board as shown in the other tutorials, you can use the example code below:
Example Code
// include NeoPixel library
#include <Adafruit_NeoPixel.h>

// The RGB LED is connected to pin 18 of the Franzininho
#define PIN         18
// There is only one LED
#define NUMPIXELS   1

// number of colors to be displayed
#define MAXCOLORS 4

// Instance of the "Adafruit_NeoPixel" object
Adafruit_NeoPixel pixels(NUMPIXELS, PIN, NEO_GRB + NEO_KHZ800);

// colors
#define RED    pixels.Color(255, 0, 0)     // red
#define GREEN  pixels.Color(0, 255, 0)     // green
#define BLUE   pixels.Color(0, 0, 255)     // blue
#define WHITE  pixels.Color(255, 255, 255) // white

// array with all colors for use in a for loop
// uint32_t is the type returned by the Color function
uint32_t   colors[MAXCOLORS] = {RED, GREEN, BLUE, WHITE};

void setup() {

  // Initialize the NeoPixel
  pixels.begin();
}

void loop() {

  // "turn off" the RGB LED
  pixels.clear();

  // display colors in sequence defined in the colors array
  for(int i = 0; i<MAXCOLORS;i++){
    pixels.setPixelColor(0,colors[i]);
    pixels.show();  // send the updated pixel to hardware
    delay(300);  // time to display the color
  }
}
Try displaying other colors and animations. Share your results with the community.
info
If you have any questions, consult the Franzininho community on Discord
| Author | Henrique Vilela |
|---|---|
| Date: | 07/10/2021 |